博士
最后登录1970-1-1
在线时间 小时
注册时间2022-7-18
|
本帖最后由 argent 于 2024-12-14 15:04 编辑
一、引言
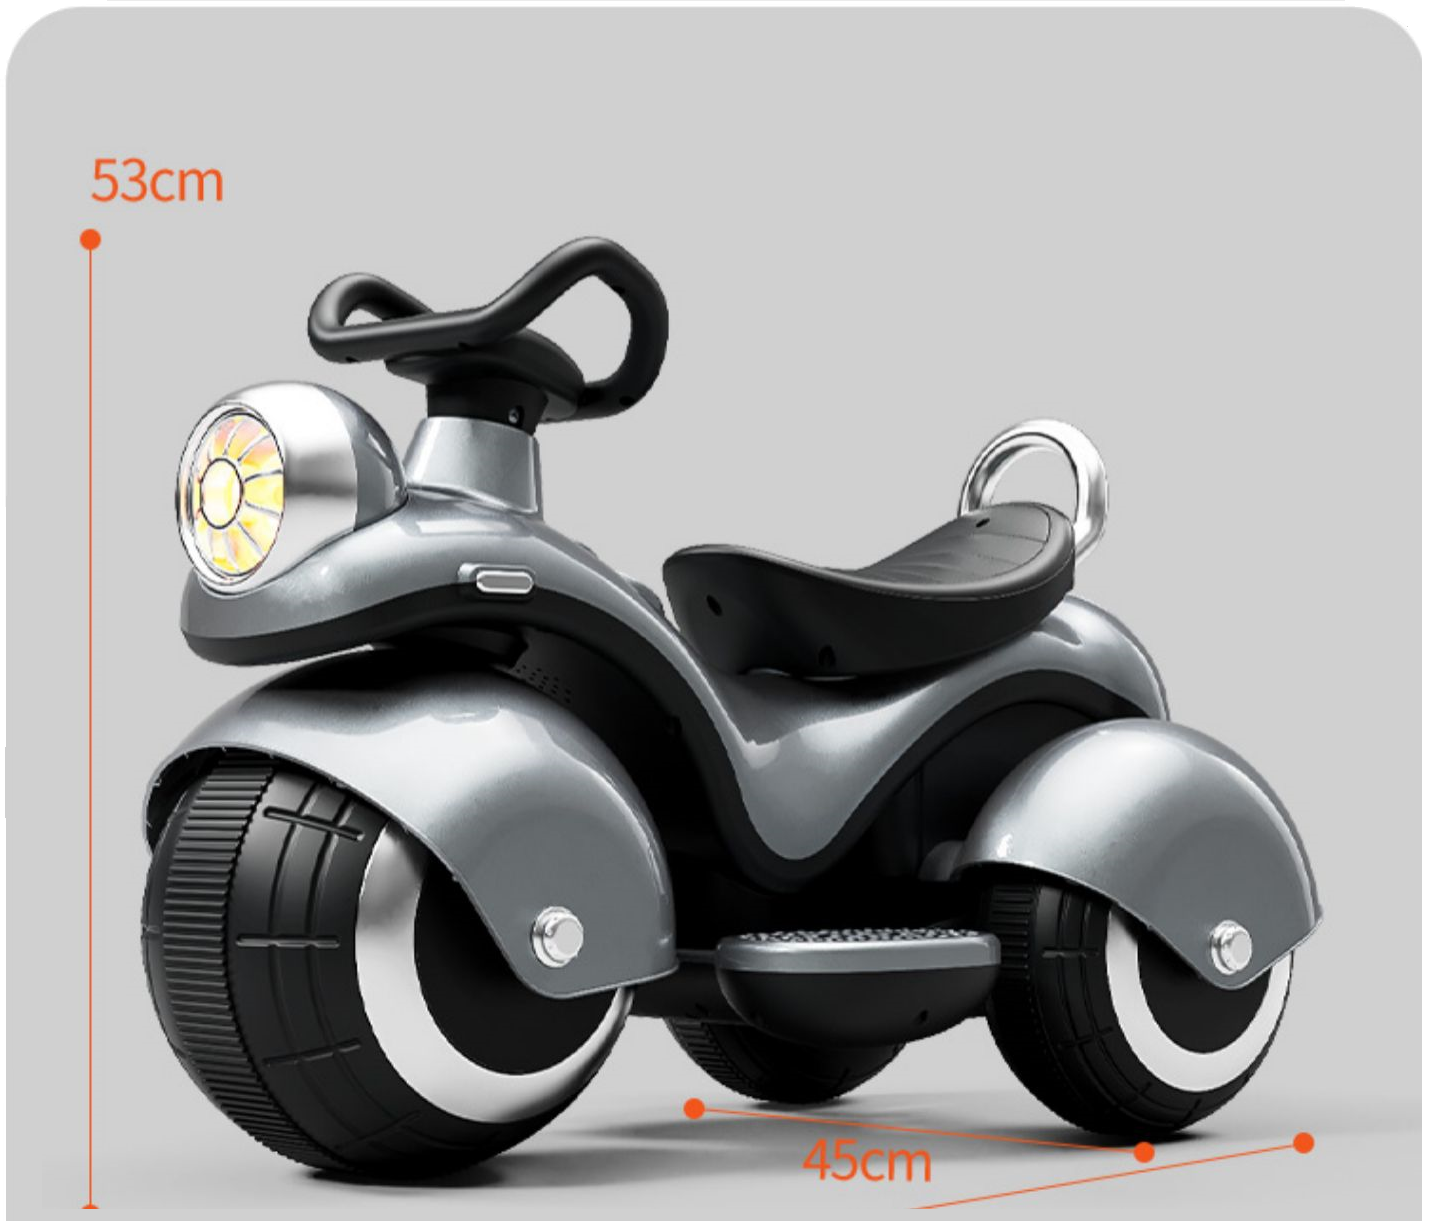
现如今独生子女越来越普遍,大人对小孩的宠爱也是常态,儿童玩具市场新品层出不穷,买一款小巧且安全耐用的儿童电动摩托车既能满足小孩的玩耍,又能减少遛娃的辛苦。开发一款性价比相对较高的儿童电动摩托车具有很大的市场需求,本期计划使用野火启明RA6T2电机控制板实现电动摩托车基本功能。野火启明RA6T2电机板是集成R7FA6T2BD3CFP MCU,该款MCU具备高性能,240MHz主频,Arm Cortex-M33内核、高达512KB的后台运行代码闪存、16KB数据闪存和带ECC的64KBSRAM,想必开发一款儿童电动摩托车是游刃有余吧。
二、系统框图
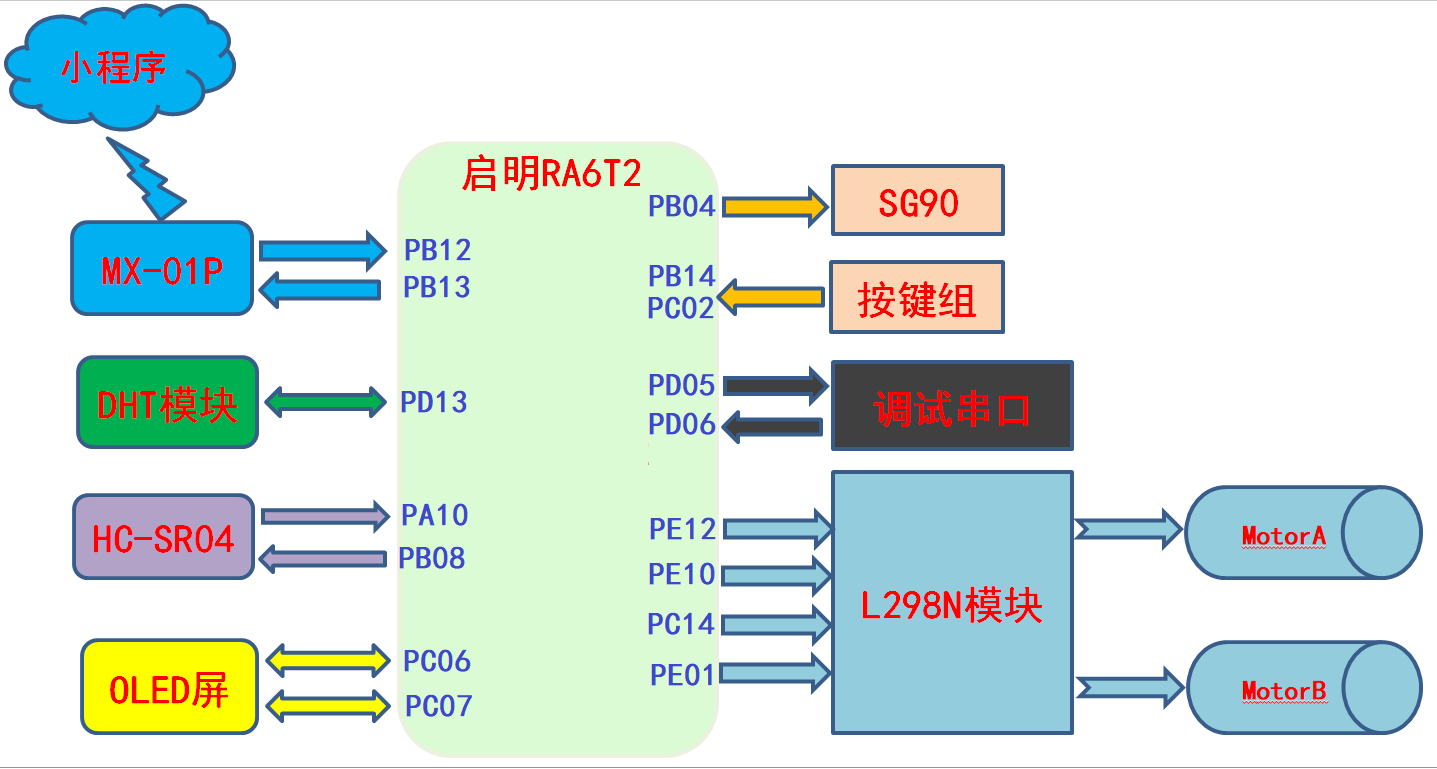
根据以上系统框图,可大致解说一下,该系统支持手机小程序与串口调试接口控制motorA与motorB运行状态,按键组控制SG90舵机转动。其它外加功能,OLED屏显示DHT11实时采集周围环境的温湿度值,HC-SR04超声波测距传感器驱使自动避障减速功能。这里的motorA代表电动摩托车的左轮,motorB代表电动摩托车的右轮,SG90舵机代表电动摩托车的前轮,按键组表示手握的方向盘。
三、硬件资源
启明6T2电机板硬件资源非常丰富,尤其是在电机应用方面,项目中只是运用到部分硬件接口。启明6T2电机板硬件资源标注图:


首先直接来张实物连线全景图!
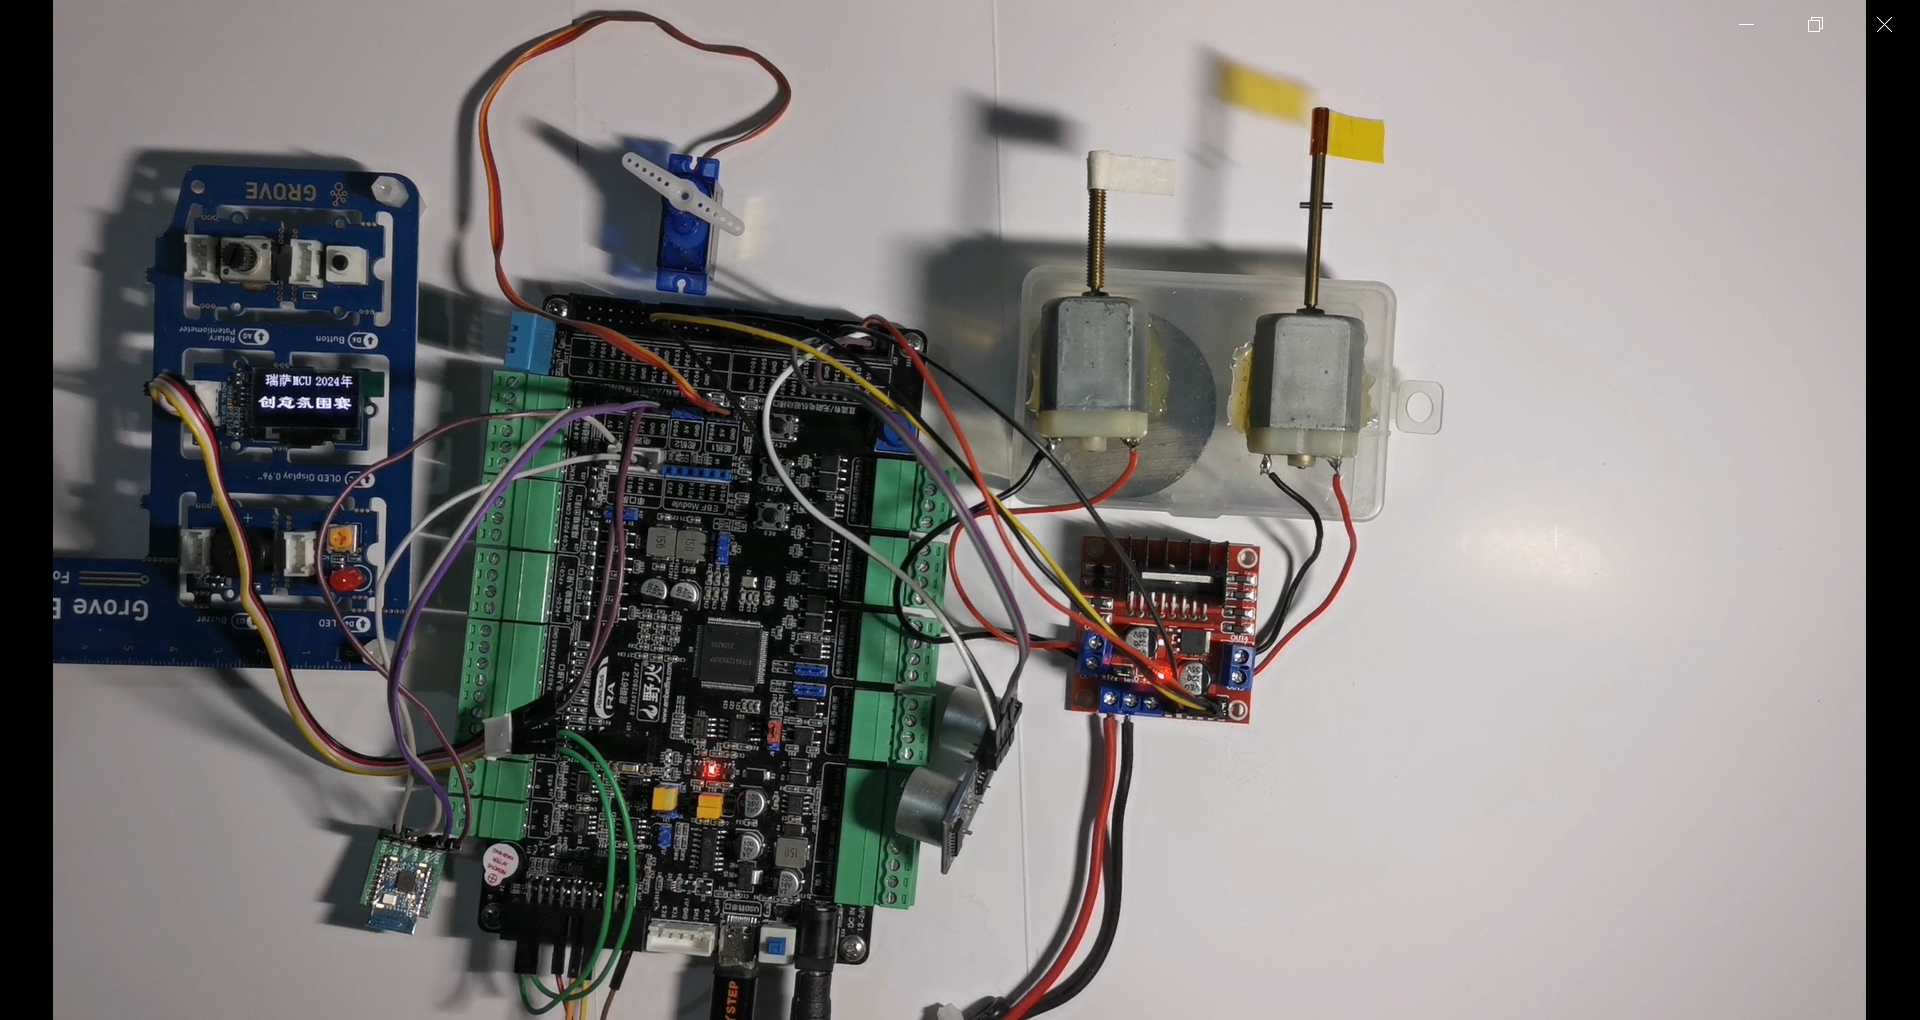
基于以上硬件资源,相信大家都比较熟悉了,这里着重介绍一下蓝牙模块。该蓝牙模块是本人在某宝平台上掏得的,MX-01P模块的封装尺寸脚位定义如下:
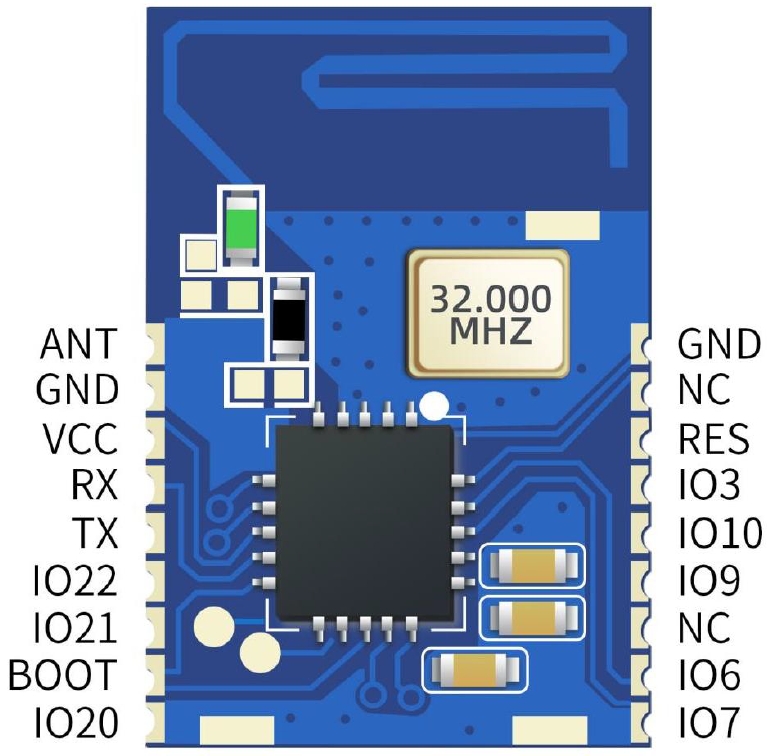
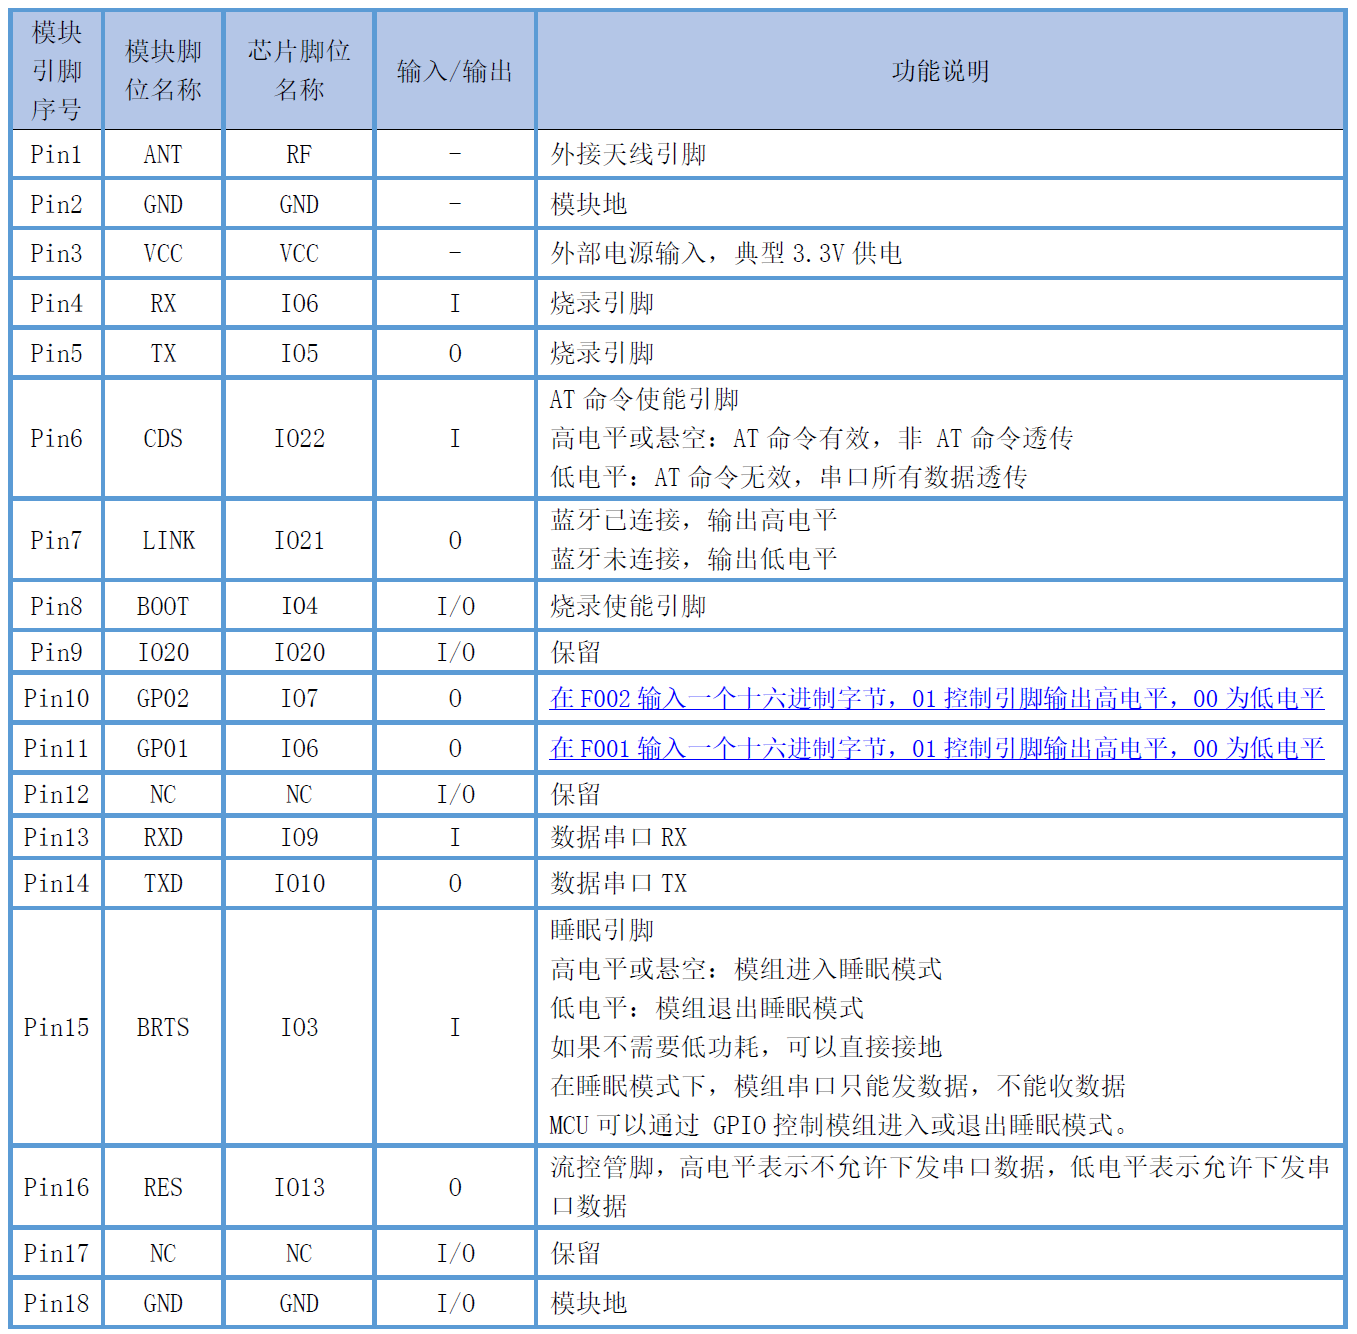
这款性价比不错,本人还专程买了搭配的底板,这样焊接在底板上,只需要将BRTS管脚接地,然后通过四根杜邦线与电机板正确连接好即可。模组的管脚定义如下:
四、FSP灵活配置
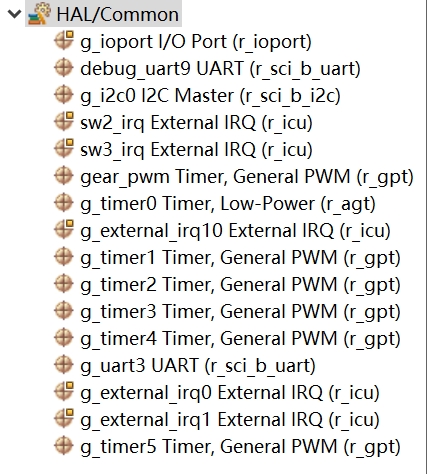
使用的Stacks资源如下:
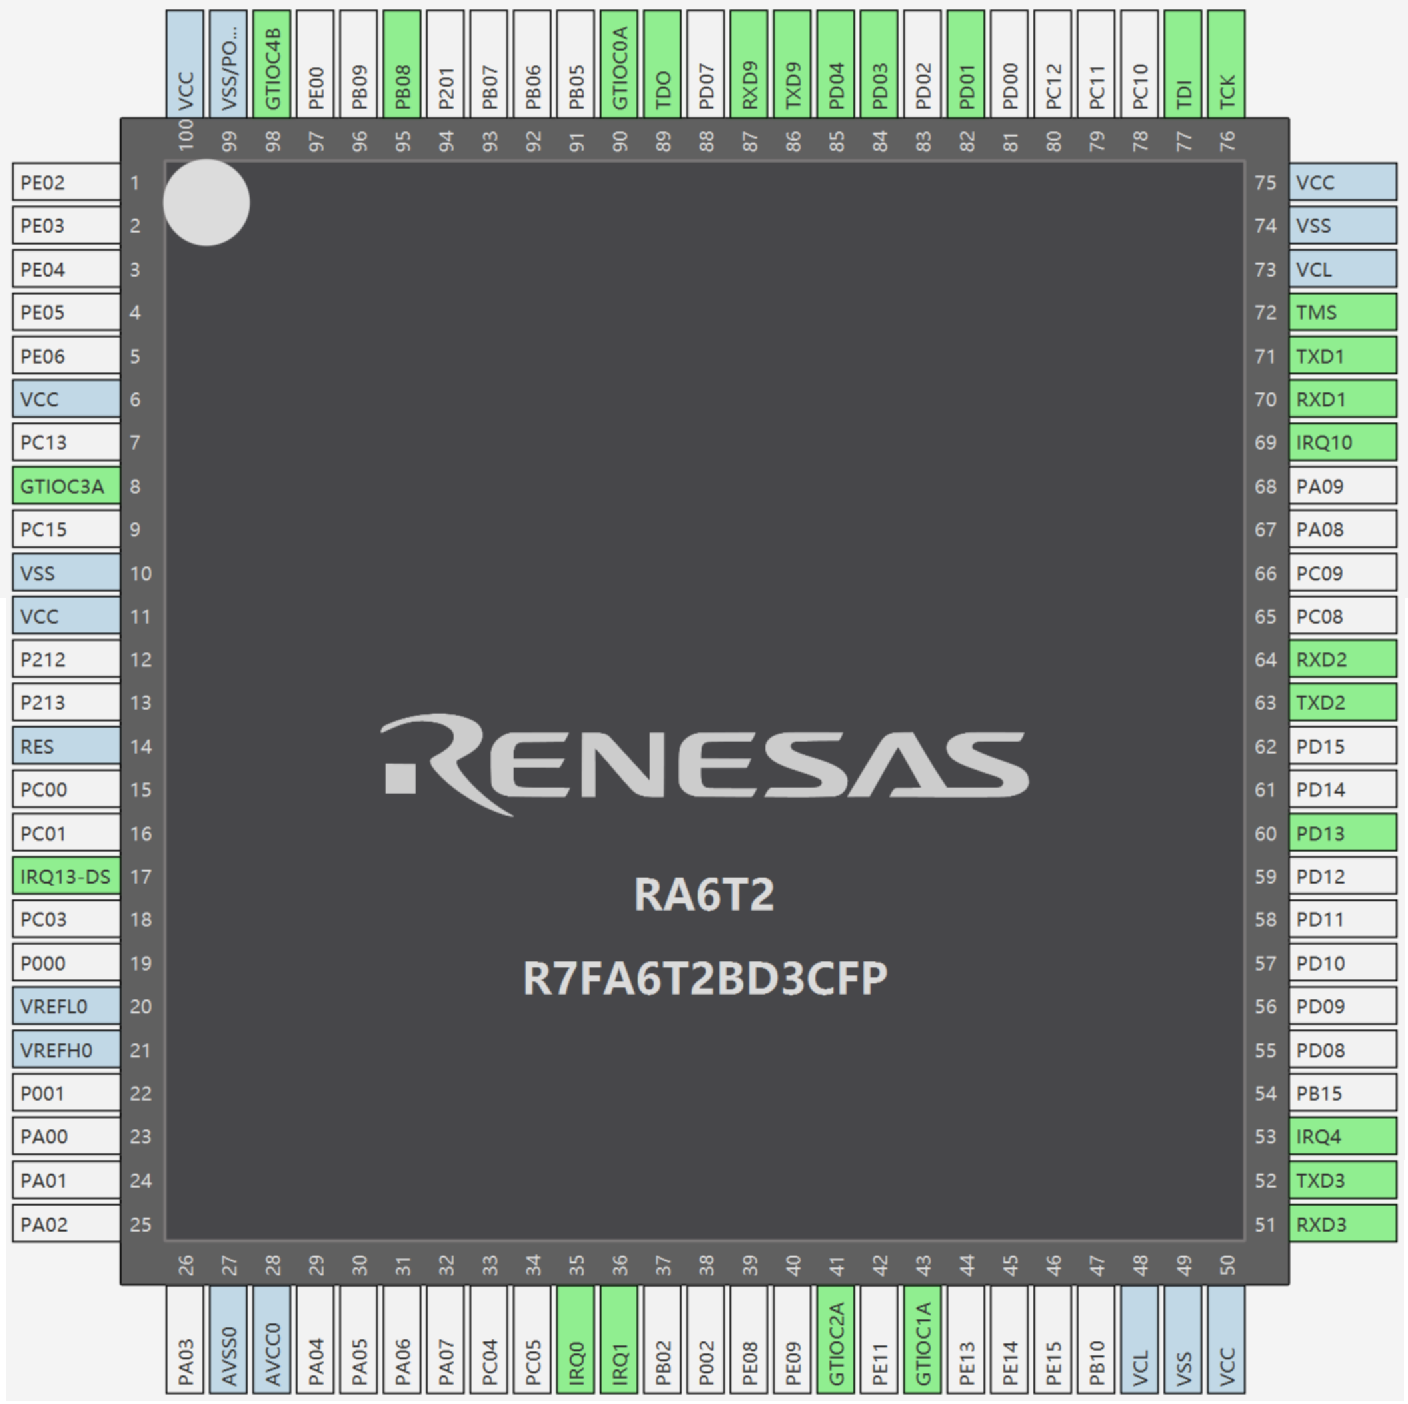
主控R7FA6T2BD3CFP的管脚利用分布:
这个简单解说一下:
(1)“g_ioport”包括项目中所有用到IO口的配置g_bsp_pin_cfg,包括LED、蜂鸣器、DHT11等GPIO口的基本配置。
(2)“debug_uart9”为type-c接口的USB转串口,用于串口信息打印,上位机串口调试助手的指令控制。
(3)“g_i2c0”是OLED屏的IIC接口的配置。
(4)“sw2_irq”与“sw3_irq”为Key1、Key2按键的配置。
(5)“gear_pwm”是方向舵机的配置。
(6)“g_timer0”为HC-SR04超声波测距模块的定时器配置,“g_external_irq10”为HC-SR04的外部中断检测。
(7)“g_timer1”为GTIOC1A(PE12),一路PWM信号连接L298N模块的IN1脚。
(8)“g_timer2”为GTIOC2A(PE10),一路PWM信号连接L298N模块的IN2脚。
(9)“g_timer3”为GTIOC3A(PC14),一路PWM信号连接L298N模块的IN3脚。
(10)“g_timer4”为GTIOC4B(PE01),一路PWM信号连接L298N模块的IN4脚。
(11)“g_uart3”为连接蓝牙模块的接口配置。
(12)“g_external_irq0”、“g_external_irq1”、“g_timer5”为电机转速反馈控制,引入pid算法。
五、指令说明
使用两个字节来控制,recv_buf[0]为电机参数控制命令,recv_buf[1]为自动模式、手动模式选项。
recv_buf[0]:0,空闲默认状态
recv_buf[0]:1,左右电机前进
recv_buf[0]:2,左右电机后退
recv_buf[0]:3,左电机转,向右转大弯
recv_buf[0]:4,右电机转,向左转大弯
recv_buf[0]:5,左右电机全速运行,快速前进
recv_buf[0]:6,左右电机停止运行
recv_buf[1]:1,自动模式
recv_buf[1]:2,手动模式
六、部分代码
hal_entry.c
- #include "hal_data.h"
- FSP_CPP_HEADER
- void R_BSP_WarmStart(bsp_warm_start_event_t event);
- FSP_CPP_FOOTER
- #include "led/bsp_led.h"
- #include "dht11/bsp_dht11.h"
- #include "key.h"
- #include "debug_uart/bsp_debug_uart.h"
- #include "motor_servo/motor_servo.h"
- #include "oled.h"
- #include "bmp.h"
- #include "hc_sr04.h"
- #include "bluetooth.h"
- #include "motor_dc.h"
- #include "motor_pid.h"
- #include "pid_calculate.h"
- #include "motor_speed.h"
- extern char Order_Buff[1];
- extern int8_t direct;
- /*******************************************************************************************************************//**
- * main() is generated by the RA Configuration editor and is used to generate threads if an RTOS is used. This function
- * is called by main() when no RTOS is used.
- **********************************************************************************************************************/
- void hal_entry(void)
- {
- uint8_t temper[2] = {0};
- uint8_t humidity[2] = {0};
- /* TODO: add your own code here */
- IRQ_Init();
- InitServoMotor();
- LED_Init();
- HC_SR04_Init();
- motor_dc_init();
- Debug_UART9_Init();
- blueTooth_Init();
- setGearAngle(0);//上电使舵机回到0度位置
- pid_param_init();
- Motor_speed_Init();
- oled_Init();
- oled_Clear();
- printf("\r\n***********************\r\n");
- printf("\n欢迎使用启明6T2开发板\r\n");
- printf("\n儿童三轮代步车控制实验\r\n");
- printf("\n按下按键1:小幅度左转\r\n");
- printf("\n按下按键2:小幅度右转\r\n");
- printf("\r\n***********************\r\n");
-
- oled_Clear();
- oled_ShowCHinese(10,0,0);//欢
- oled_ShowCHinese(18+10,0,1);//迎
- oled_ShowCHinese(36+10,0,2);//使
- oled_ShowCHinese(54+10,0,3);//用
- oled_PrintfString(6,3,(unsigned char*)"RA6T2 MotorTest");
- oled_PrintfString(6,6,(unsigned char*)"2024-12-08");
- R_BSP_SoftwareDelay(1200, BSP_DELAY_UNITS_MILLISECONDS);
- oled_Clear();
- oled_ShowCHinese(10,0,4);//瑞
- oled_ShowCHinese(28,0,5);//萨
- oled_PrintfString(46,0,(unsigned char*)"MCU");
- oled_PrintfString(76,0,(unsigned char*)"2024");
- oled_ShowCHinese(110,0,9);//年
- oled_DrawBMP(0,2,128,8,BMP1);
- R_BSP_SoftwareDelay(1200, BSP_DELAY_UNITS_MILLISECONDS);
- oled_Clear();
- oled_DrawBMP(0,0,128,8,BMP2);
- R_BSP_SoftwareDelay(1000, BSP_DELAY_UNITS_MILLISECONDS);
- oled_SetCharSize(FONT_16);
- while(1)
- {
- DHT11_Read_Data(temper,humidity);
- R_BSP_SoftwareDelay(300,BSP_DELAY_UNITS_MILLISECONDS);
- if(direct == 0)
- {
- oled_Clear();
- oled_ShowCHinese(0,2,10);//当
- oled_ShowCHinese(18,2,11);//前
- oled_ShowCHinese(36,2,12);//温
- oled_ShowCHinese(54,2,13);//度
- oled_PrintfString(72,2,(unsigned char*)":");
- oled_ShowNum(80,2,temper[0],2);
- oled_ShowCHinese(98,2,16);//℃
- oled_ShowCHinese(0,5,10);//当
- oled_ShowCHinese(18,5,11);//前
- oled_ShowCHinese(36,5,14);//温
- oled_ShowCHinese(54,5,15);//度
- oled_PrintfString(72,5,(unsigned char*)":");
- oled_ShowNum(80,5,humidity[0],2);
- oled_PrintfString(98,5,(unsigned char*)"%RH");
- }
- if(direct==1)
- {
- oled_Clear();
- oled_DrawBMP(0,0,128,8,BMP3);
- direct = 0;
- }
- else if(direct==2)
- {
- oled_Clear();
- oled_DrawBMP(0,0,128,8,BMP4);
- direct = 0;
- }
- if( stru_BlueCmd.mode == MANUAL )
- {
- motor_ActRunCtrl();
- }
- else if( stru_BlueCmd.mode == AUTO )
- {
- motor_pid_control();
- }
- memset(temper,0,sizeof(temper));
- memset(humidity,0,sizeof(humidity));
- }
-
- #if BSP_TZ_SECURE_BUILD
- /* Enter non-secure code */
- R_BSP_NonSecureEnter();
- #endif
- }
- /*******************************************************************************************************************//**
- * This function is called at various points during the startup process. This implementation uses the event that is
- * called right before main() to set up the pins.
- *
- * @param[in] event Where at in the start up process the code is currently at
- **********************************************************************************************************************/
- void R_BSP_WarmStart (bsp_warm_start_event_t event)
- {
- if (BSP_WARM_START_RESET == event)
- {
- #if BSP_FEATURE_FLASH_LP_VERSION != 0
- /* Enable reading from data flash. */
- R_FACI_LP->DFLCTL = 1U;
- /* Would normally have to wait tDSTOP(6us) for data flash recovery. Placing the enable here, before clock and
- * C runtime initialization, should negate the need for a delay since the initialization will typically take more than 6us. */
- #endif
- }
- if (BSP_WARM_START_POST_C == event)
- {
- /* C runtime environment and system clocks are setup. */
- /* Configure pins. */
- R_IOPORT_Open(&g_ioport_ctrl, g_ioport.p_cfg);
- }
- }
- #if BSP_TZ_SECURE_BUILD
- BSP_CMSE_NONSECURE_ENTRY void template_nonsecure_callable ();
- /* Trustzone Secure Projects require at least one nonsecure callable function in order to build (Remove this if it is not required to build). */
- BSP_CMSE_NONSECURE_ENTRY void template_nonsecure_callable ()
- {
- }
- #endif
七、控制效果演示
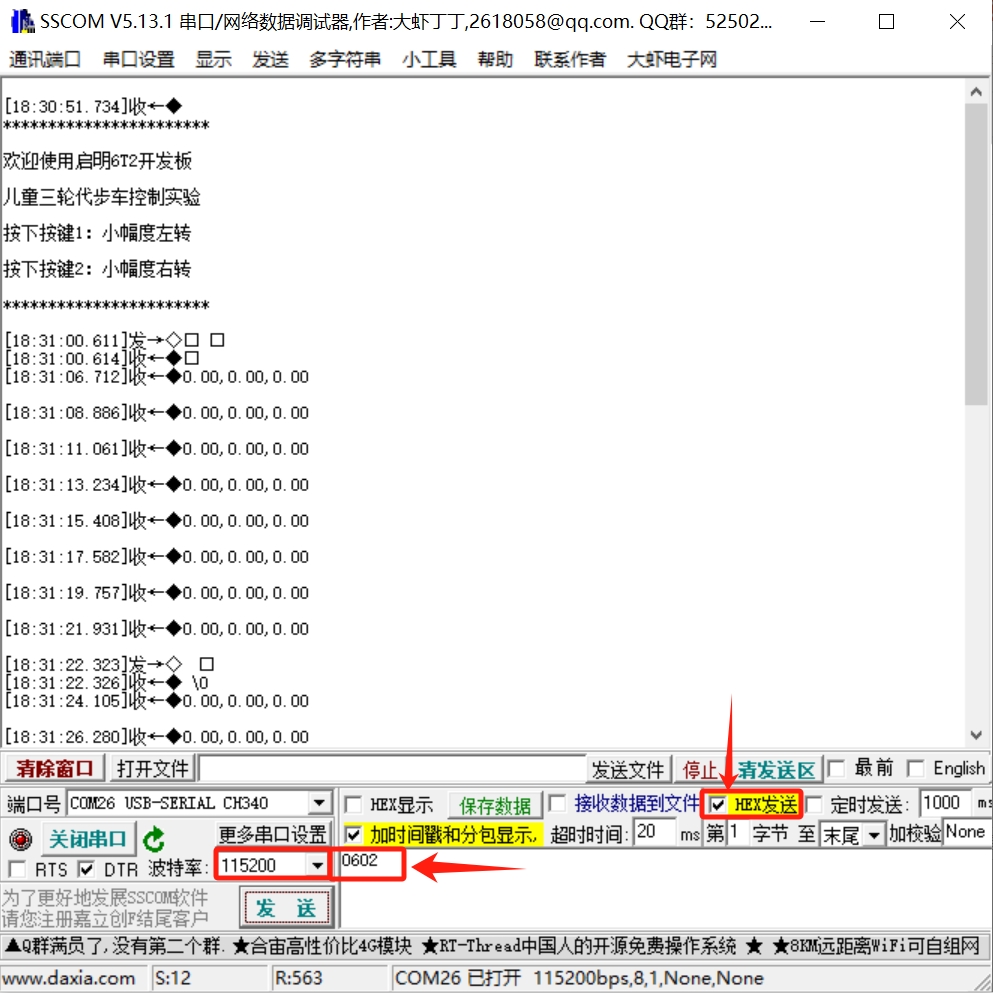
录制的视频是采用手机端的小程序蓝牙无线控制方式,去控制左右电机的转动状态。由于HC-SR04超声波测距模块需要在比较空旷的地方,组装成小车模型才好演示其自动控制效果,这里就不再录制视频,不过发送指令切换成自动模式后,用手移动HC-SR04超声波测距模块,电机会做出相应动作。当然上位机串口调试助手也是可以通过发送hex格式的数据进行控制左右电机运转的。
第二期瑞萨RA MCU创意氛围赛+启明儿童三轮车
八、工程源码分享
 Remote_Control_Tricycle.zip
(1.73 MB, 下载次数: 9)
|
|