|
入门第八课《使用寄存机点亮LED》课后作业 在入门篇 第八节课最后的两道题,如图

1.实现GPIO其他寄存器的映射 2.采用操作BSRR、BRR来编程,点亮LED 顺便可以用寄存器映射的方案升级优化之前写的闪烁程序!
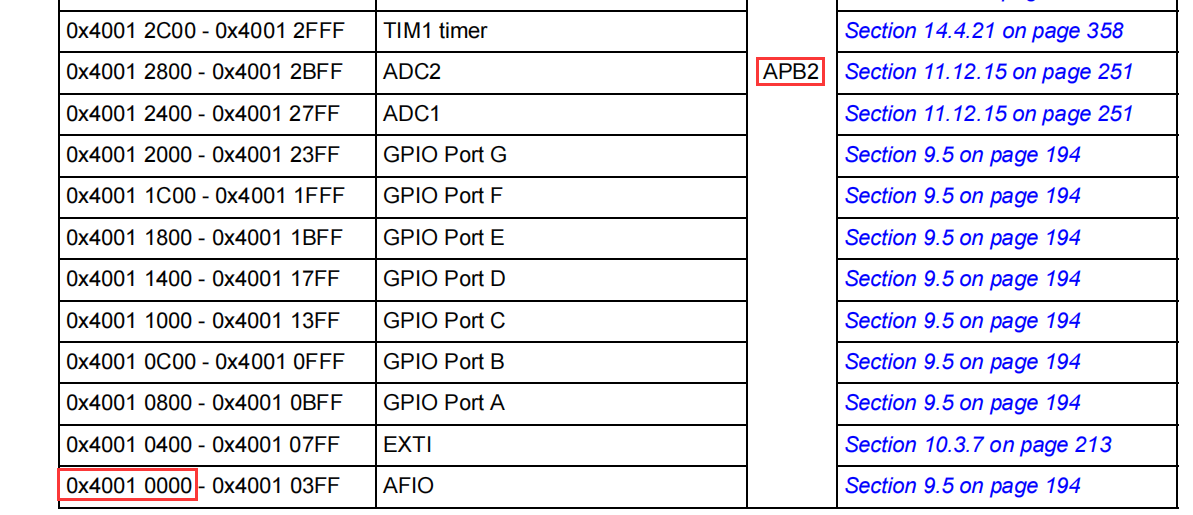
存储器映射需要编写头文件:stm32f10x.h 查看参考手册的存储器映射表(英文版p51-53 中文版p28-29)

可以看到外设首地址为0x4000 0000。

APB2总线基地址为0x4001 0000,相对于起始地址的偏移量为0x1 0000。

AHB总线基地址为0x4001 8000,相对于起始地址的偏移量为0x1 8000。但是因为需要使用的是RCC时钟,它的首地址为0x4002 1000。 为了方便计算RCC的偏移量将其看作首地址为0x4002 0000,相对地址为0x2 0000。(写首地址0x4001 8000也没有问题,只是计算略微繁琐)
根据上述条件可以写出对于外设、AHB总线、APB2总线基地址的宏定义
- #define PERIPH_BASE ((unsigned int)0x40000000)
- #define APB2PERIPH_BASE (PERIPH_BASE + 0x10000)
- #define AHBPERIPH_BASE (PERIPH_BASE + 0x20000)

RCC时钟的首地址为0x4002 1000,相对于AHB基地址0x4002 0000的偏移量为0x1000。

GPIOB端口的首地址为0x4001 0C00,相对于APB2基地址0x4001 0000的偏移量为0x0C00。
根据上述条件可以对RCC和GPIOB的基地址宏定义:
- #define RCC_BASE (AHBPERIPH_BASE+0x1000)
- #define GPIO_BASE (APB2PERIPH_BASE+0x0C00)
APB2外设时钟使能寄存器RCC_APB2ENR(英文版p70 中文版p112)

偏移量为0x18。

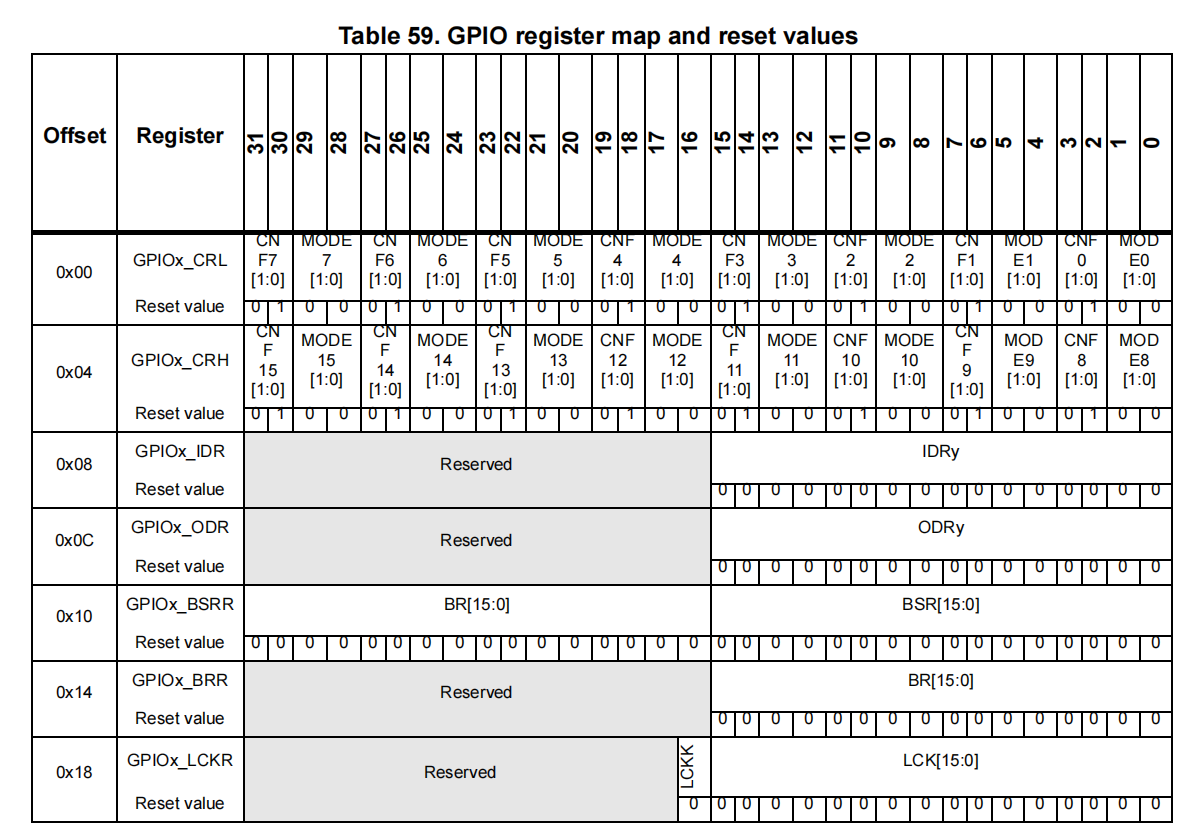
GPIO所以寄存器一览,Offset是偏移量,根据这张表可以开始写宏定义了。(中文版的偏移地址0x00h的“x”没了....) - #define RCC_APB2ENR *(unsigned int*)(RCC_BASE + 0x18)
- #define GPIO_CRL *(unsigned int*)(GPIO_BASE + 0x00)
- #define GPIO_CRH *(unsigned int*)(GPIO_BASE + 0x04)
- #define GPIO_IDR *(unsigned int*)(GPIO_BASE + 0x08)
- #define GPIO_ODR *(unsigned int*)(GPIO_BASE + 0x0C)
- #define GPIO_BSRR *(unsigned int*)(GPIO_BASE + 0x10)
- #define GPIO_BRR *(unsigned int*)(GPIO_BASE + 0x14)
- #define GPIO_LCKR *(unsigned int*)(GPIO_BASE + 0x18)
整体的头文件应该长这样:(#ifndef __STM32F10X_H #define __STM32F10X_H #endif是为了防止重复引用头文件)
- #ifndef __STM32F10X_H
- #define __STM32F10X_H
- //用来存放STM32寄存器映射的代码
- //外设 peripheral
- #define PERIPH_BASE ((unsigned int)0x40000000)
- #define APB2PERIPH_BASE (PERIPH_BASE + 0x10000)
- #define AHBPERIPH_BASE (PERIPH_BASE + 0x20000)
- #define RCC_BASE (AHBPERIPH_BASE+0x1000)
- #define GPIO_BASE (APB2PERIPH_BASE+0x0C00)
- #define RCC_APB2ENR *(unsigned int*)(RCC_BASE + 0x18)
- #define GPIO_CRL *(unsigned int*)(GPIO_BASE + 0x00)
- #define GPIO_CRH *(unsigned int*)(GPIO_BASE + 0x04)
- #define GPIO_IDR *(unsigned int*)(GPIO_BASE + 0x08)
- #define GPIO_ODR *(unsigned int*)(GPIO_BASE + 0x0C)
- #define GPIO_BSRR *(unsigned int*)(GPIO_BASE + 0x10)
- #define GPIO_BRR *(unsigned int*)(GPIO_BASE + 0x14)
- #define GPIO_LCKR *(unsigned int*)(GPIO_BASE + 0x18)
- #endif
之前所有的*(unsigned int*)(0x....)都可以用定义好的别名GPIO....替代了,简化了代码。
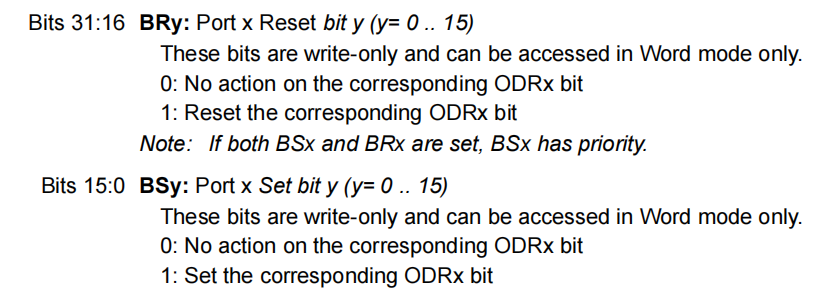
端口位设置/清除寄存器GPIOx_BSRR作用:


高16位清零,低16位 置1;如果同时设置,低16位优先级更高。
端口位清除寄存器GPIOx_BRR作用:

和BSRR寄存器高16位一样,清零操作。 对于LED这样的低电平有效的外设来说,应清零使能,置1禁用。 GPIO_BRR |=(1<<color); //led使能 GPIO_BSRR |=(1<<color);//led停止
将第七课代码中繁琐的地址用寄存器映射替代,优化整合代码后:
红灯闪烁: - #include "stm32f10x.h"
- #define Red 5
- #define Green 0
- #define Blue 1
- void delay_us(int delay_us);
- void delay_ms(int delay_ms);
- void initial(int cl);
- void ledBlink(int cl);
- int main(void)
- {
- RCC_APB2ENR |=(1<<3);
- while(1)
- {
- initial(Red);
- ledBlink(Red);
- delay_ms(100);
- }
- }
- //函数体为空,目的是为了骗过编译器不报错
- void SystemInit(void)
- {}
- //微秒级的延时
- void delay_us(int delay_us)
- {
- volatile unsigned int num;
- volatile unsigned int t;
- for (num = 0; num < delay_us; num++)
- {
- t = 11;
- while (t != 0)
- {
- t--;
- }
- }
- }
- //毫秒级的延时
- void delay_ms(int delay_ms)
- {
- volatile unsigned int num;
- for (num = 0; num < delay_ms; num++)
- {
- delay_us(1000);
- }
- }
- void initial(int cl)
- {
- GPIO_CRL &=~((0x0F)<<(4*cl));
- }
- void ledBlink(int cl)
- {
- GPIO_CRL |=(1<<(4*cl));
- GPIO_BRR |=(1<<cl);
- delay_ms(100);
- GPIO_BSRR |=(1<<cl);
- }
红蓝灯交替:
- #include "stm32f10x.h"
- #define Red 5
- #define Green 0
- #define Blue 1
- void delay_us(int delay_us);
- void delay_ms(int delay_ms);
- void initial(int cl);
- void ledBlink(int cl);
- int main(void)
- {
- RCC_APB2ENR |=(1<<3);
- while(1)
- {
- initial(Red);
- ledBlink(Red);
- initial(Blue);
- ledBlink(Blue);
- }
- }
- //函数体为空,目的是为了骗过编译器不报错
- void SystemInit(void)
- {}
- //微秒级的延时
- void delay_us(int delay_us)
- {
- volatile unsigned int num;
- volatile unsigned int t;
- for (num = 0; num < delay_us; num++)
- {
- t = 11;
- while (t != 0)
- {
- t--;
- }
- }
- }
- //毫秒级的延时
- void delay_ms(int delay_ms)
- {
- volatile unsigned int num;
- for (num = 0; num < delay_ms; num++)
- {
- delay_us(1000);
- }
- }
- void initial(int cl)
- {
- GPIO_CRL &=~((0x0F)<<(4*cl));
- }
- void ledBlink(int cl)
- {
- GPIO_CRL |=(1<<(4*cl));
- GPIO_BRR |=(1<<cl);
- delay_ms(100);
- GPIO_BSRR |=(1<<cl);
- }
|