|
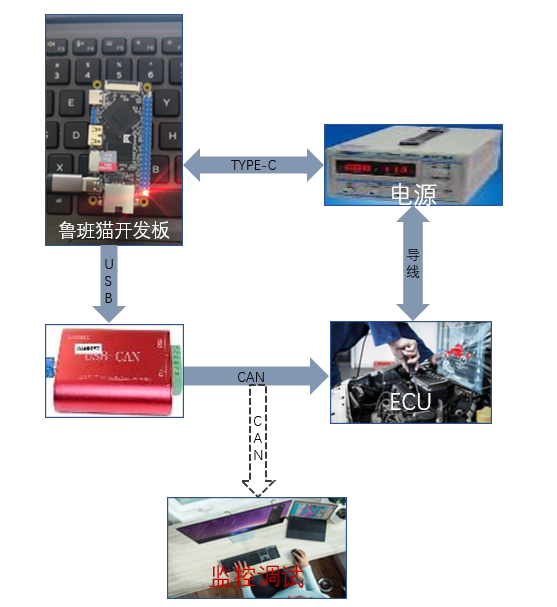
低成本便携全自动化ECU诊断升级和测试工具 工具硬件环境鲁班猫开发板 USBCAN(支持LINUX下开发的USBCAN) 待测试ECU 电源(用于ECU供电) TYPE-C线(用于开发板供电) 软件开发环境SSH终端 vscode pyqt5 整体设备框图工具实现功能- 通过输入序列号后自动运行,序列号也可以通过扫描枪实现。
- 通过UDS DID服务读取ECU版本。
- 通过UDS 服务升级新版APP。
- 检测工作电流是否符合目标。
- 通过19服务读取故障码,检查ECU是否有硬件问题等。
- 工具支持大部14229服务。
- 支持log保持用于生产日志。
说明: 为了方便看发送报文效果采用了两个USBCAN一个连接电脑用于查看报文。 遗憾的是没拿鲁班猫驱动触摸屏的方式展示此工具。用了方便开发调试的SSH方式显示工具画面。 基础验证
1.基础CAN通信功能使用到的库:python-can,canalystii import canbus = can.interface.Bus(bustype='canalystii', channel=0, bitrate=500000)msg = can.Message(arbitration_id=0x181, data=[0xEE, 0xFE, 0xFE, 0xFF, 0xFE, 0xFF, 0xFF, 0xFE],is_extended_id=False)bus.send(msg)bus.shutdown()通过上述代码既通过USBCAN发送报文到ECU。
接下来我们就可以通过这个库实现复杂的功能。例如周期发送报文只需一个函数即可,多个周期报文发送等等。
CAN的更多参数设置方法可以通过在线文档查找对应方法。
参考库官方在线文档:[color=rgb(12, 147, 228) !important]python-can · PyPI 此库不仅可以用来驱动USBCAN还可以来驱动vector、ETAS、PCAN等设备。 2.多帧通信验证使用到的库:can-isotp (ISO-15765) import isotpimport loggingimport timeimport canESC_TX_ID = 0x73EESC_RX_ID_PHYS = 0x736ESC_RX_ID_FUNC = 0x7DFbus = can.interface.Bus(bustype='canalystii', channel=0, bitrate=500000)isotpaddr_PHYS = isotp.Address(isotp.AddressingMode.Normal_11bits, txid=ESC_RX_ID_PHYS, rxid = ESC_TX_ID)isotpaddr_FUNC = isotp.Address(isotp.AddressingMode.Normal_11bits, txid=ESC_RX_ID_FUNC, rxid = ESC_TX_ID)stack = isotp.CanStack(bus, address=isotpaddr_PHYS, error_handler=my_error_handler)stack.send(b'Hello, this is a long payload sent in small chunks')while stack.transmitting(): stack.process() time.sleep(stack.sleep_time())print("Payload transmission done.")bus.shutdown()效果如图:
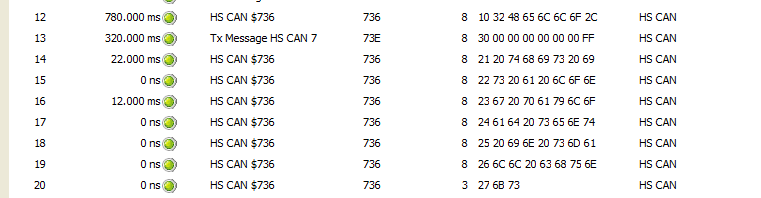

本验证是通过两个USBCAN实现。如模拟ECU端不发送应答诊,程序会报告详细的警告信息。 3.诊断功能验证# from can.interfaces.vector import VectorBusimport canimport isotpimport udsoncanfrom udsoncan.connections import PythonIsoTpConnectionfrom udsoncan.client import Clientimport udsoncan.configs# Refer to isotp documentation for full details about parametersisotp_params = { 'stmin' : 32, # Will request the sender to wait 32ms between consecutive frame. 0-127ms or 100-900ns with values from 0xF1-0xF9 'blocksize' : 8, # Request the sender to send 8 consecutives frames before sending a new flow control message 'wftmax' : 0, # Number of wait frame allowed before triggering an error 'tx_data_length' : 8, # Link layer (CAN layer) works with 8 byte payload (CAN 2.0) 'tx_data_min_length' : None, # Minimum length of CAN messages. When different from None, messages are padded to meet this length. Works with CAN 2.0 and CAN FD. 'tx_padding' : 0, # Will pad all transmitted CAN messages with byte 0x00. 'rx_flowcontrol_timeout' : 1000, # Triggers a timeout if a flow control is awaited for more than 1000 milliseconds 'rx_consecutive_frame_timeout' : 1000, # Triggers a timeout if a consecutive frame is awaited for more than 1000 milliseconds 'squash_stmin_requirement' : False, # When sending, respect the stmin requirement of the receiver. If set to True, go as fast as possible. 'max_frame_size' : 4095 # Limit the size of receive frame.}bus = can.interface.Bus(bustype='canalystii', channel=0, bitrate=500000) # Link Layer (CAN protocol)tp_addr = isotp.Address(isotp.AddressingMode.Normal_11bits, txid=0x123, rxid=0x456) # Network layer addressing schemestack = isotp.CanStack(bus=bus, address=tp_addr, params=isotp_params) # Network/Transport layer (IsoTP protocol)stack.set_sleep_timing(0, 0) # Speed First (do not sleep)conn = PythonIsoTpConnection(stack) # interface between Application and Transport layerconfig = dict(udsoncan.configs.default_client_config)config['data_identifiers'] = { 0xF190 : udsoncan.AsciiCodec(15) # Codec that read ASCII string. We must tell the length of the string }with Client(conn, request_timeout=1, config=config) as client: # Application layer (UDS protocol) response = client.read_data_by_identifier([0xF190]) print(response.service_data.values[0xF190]) # This is a dict of DID:Valuebus.shutdown()上述代码实现了UDS的22服务读取0xF190 DID 15字节VIN码
的功能。
经验总结通过python 实现这个工具可以横向扩展很多CAN硬件包括vector。这个超赞! 通过python UDS库实现 升级等功能,自己编写代码量很小就可以实现功能。 鲁班猫开发很小巧但功能刚好够用,使用方便。 适合平时拿着玩。用于测试点东西,开发个小工具。 缺点开源库存在BUG。例如: Did not receive frame IsoTP Transport layer in timeout 这个错误如果参数检测都配置对了,可能是库的问题。自己通过修改库解决,也可能是自己没用明白,欢迎探讨! 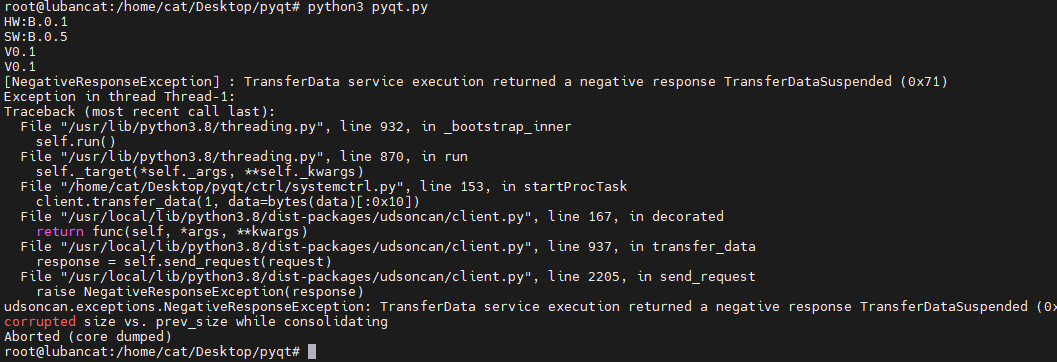
当运行不符合服务需求时就会返回对应问题的错误码。
|


 发表于 2023-5-19 10:08:35
 提升卡
提升卡